Mastering Photography: Aperture, Shutter Speed, and ISO Settings
Photography is a captivating art form that allows us to capture moments, emotions, and the beauty of the world around us. To create compelling images, understanding the three fundamental components of exposure – aperture, shutter speed, and ISO settings – is essential. In this blog, we will explore how these settings work together to achieve the perfect shot.
Aperture: Controlling Light and Depth of Field
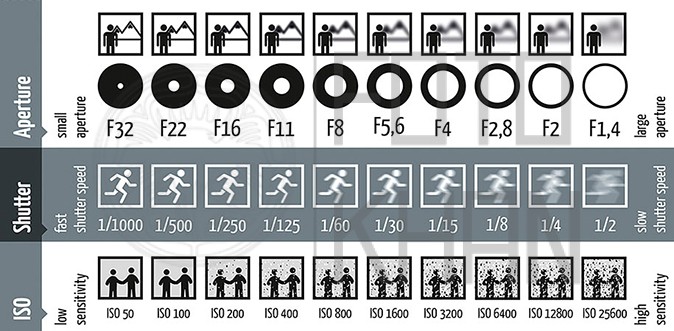
Aperture refers to the size of the opening in the camera’s lens through which light enters. It’s measured in f-stops, where a smaller f-number represents a larger aperture and vice versa. Aperture controls two critical aspects of photography: the amount of light entering the camera and the depth of field.
- Light Control: When you adjust the aperture, you control the volume of light that reaches the camera’s sensor. A larger aperture (e.g., f/1.4 or f/2.8) allows more light in, making it ideal for low-light conditions. A smaller aperture (e.g., f/8 or f/16) reduces the amount of light and is suited for well-lit scenes.
- Depth of Field (DOF): Aperture also influences DOF, or the area in your photo that appears sharp and in focus. A wide aperture (small f-number) results in a shallow DOF, with only a small portion of the image in focus. This is often used for portraits, isolating the subject from the background. A narrow aperture (large f-number) provides a deep DOF, ensuring more of the scene is in focus, ideal for landscapes.
Shutter Speed: Capturing Motion and Light
Shutter speed determines the duration for which the camera’s sensor is exposed to light. It’s measured in seconds or fractions of a second. The choice of shutter speed plays a crucial role in capturing motion and controlling exposure.
- Motion Control: Fast shutter speeds (e.g., 1/1000 or 1/500) are used to freeze fast-moving subjects, such as athletes or wildlife in action. Conversely, slow shutter speeds (e.g., 1/30 or 1/15) create a sense of motion in photos, capturing activities like flowing water or light trails from vehicles.
- Exposure Control: Shutter speed directly influences the amount of light reaching the sensor. A faster shutter speed reduces the duration of exposure, allowing less light in. This is handy for bright conditions or when you want to limit light in long-exposure photography. Conversely, slower shutter speeds allow more light, making them suitable for low-light situations.
ISO: Sensitivity to Light
ISO, derived from the International Organization for Standardization, represents the camera sensor’s sensitivity to light. Adjusting the ISO setting allows you to capture images in various lighting conditions, but it also comes with trade-offs.
- Low ISO: Lower ISO values (e.g., 100 or 200) make the sensor less sensitive to light. This results in images with minimal noise or grain, suitable for well-lit scenes. However, it requires more light or slower shutter speeds in darker environments.
- High ISO: Higher ISO values (e.g., 800, 1600, or more) increase the sensor’s sensitivity to light, making it ideal for low-light conditions. However, higher ISO settings introduce digital noise, which can degrade image quality. To mitigate noise, modern cameras have advanced noise reduction features.
Balancing the Trio: Achieving the Perfect Exposure
The art of photography lies in balancing aperture, shutter speed, and ISO settings to achieve the perfect exposure for your desired shot.
- Fast Action: If you’re photographing a fast-moving subject on a sunny day, start with a fast shutter speed (e.g., 1/1000), a moderate aperture (e.g., f/8), and a low ISO (e.g., 100) for minimal noise.
- Low-Light Portrait: For a portrait in low light, use a wide aperture (e.g., f/1.4), a moderate shutter speed (e.g., 1/125), and a higher ISO (e.g., 800) to capture sufficient light.
- Landscape Photography: To capture a sweeping landscape in sharp focus, opt for a narrow aperture (e.g., f/16), a tripod to steady the camera for slower shutter speeds (e.g., 1/15), and a low ISO (e.g., 100) to maintain image clarity.
- Creative Long Exposures: When capturing light trails or waterfalls, use a tripod, a slow shutter speed (e.g., several seconds to minutes), and a low ISO for optimum image quality.
Using Manual Mode for Full Control
While many modern cameras offer semi-automatic modes, like aperture priority or shutter priority, true mastery of photography often comes from using manual mode. Manual mode allows you to make precise adjustments to all three exposure settings, giving you full creative control.
In manual mode, start with the essential exposure setting for your shot: aperture for depth of field, shutter speed for motion control, or ISO for lighting conditions. Then, adjust the other settings to balance the exposure. Practice and experimentation will help you refine your skills and develop your photographic style.
Conclusion: A Symphony of Light and Artistry
Aperture, shutter speed, and ISO settings are the tools that photographers use to create a symphony of light, motion, and creativity. The interplay of these settings forms the foundation of photographic artistry, allowing you to capture the world as you see it, with your unique perspective.
To become a skilled photographer, embrace the creative process of combining these elements to craft your visual narratives. Over time, you’ll discover that the trio of aperture, shutter speed, and ISO settings empowers you to paint with light and unveil the beauty, emotion, and stories that exist in every frame. So, pick up your camera, explore the possibilities, and let your photographic journey begin.

